This article describes how to authenticate and connect an ESP8266 based Konnected device to AWS IoT Core.
This article applies to the Konnected Alarm Panel v1 & v2, Alarm Panel Add-on v1 & v2 and Garage Door Opener v1 running Konnected firmware.
Konnected's ESP8266 based firmware connects to AWS IoT using MQTT over WebSocket protocol and authenticates with AWS IoT using a custom authorizer. A custom authorizer is an AWS Lambda function maintained by you that receives a token from a Konnected device to look up a device or identity on your cloud, and then decide whether or not to allow that device to connect to IoT Core.
This article will guide you how to structure your application to use an IoT Custom Authorizer and how to provision a Konnected device to connect to AWS IoT using a token and token_signature provided by your cloud.
Read & Understand this guide by AWS first!
The steps to create a custom authorizer are detailed in the AWS guide linked above. After reading that, consider the following design considerations when building your cloud service:
Identifying Devices by Token
Your cloud service should have some way of registering devices, associating them to a user, and assigning them a unique token. The token value can be any unique string that can identify the device. You can use the device ID itself as a token, or generate a unique token per device and store it in a database table in your AWS cloud.
Your cloud service should be able to look up a device by its token to determine if it should have permission to connect to your cloud.
For this example, we'll imagine that we have a database table called konnected-devices that stores information about a device with ID 8840f5209948:
| Device ID | User ID | Token |
|---|---|---|
| 8840f5209948 | 6524 | LRYiB2EsgxDPuQaie2h8atDi |
Lambda Authorizer Function
Your custom authorizer Lambda function should receive the token to look up a device. If the device is authorized, the Lambda function should return a JSON document described here, granting the device access to connect, subscribe, and publish to the appropriate IoT resources. Example:
{
  "isAuthenticated": true,
  "principalId": "8840f5209948",
  "disconnectAfterInSeconds": 86400,
	"refreshAfterInSeconds": 21600,
 	"policyDocuments": [
    {
      "Version": "2012-10-17",
      "Statement": [
        {
          "Effect": "Allow",
          "Action": "iot:Connect",
          "Resource": "arn:aws:iot:AWS_REGION:AWS_ACCOUNT_ID:client/*",
        },
        {
          "Effect": "Allow",
          "Action": ["iot:Publish","iot:Receive"],
          "Resource": "arn:aws:iot:AWS_REGION:AWS_ACCOUNT_ID:topic/konnected/8840f5209948/*",
        },
        {
          "Effect": "Allow",
          "Action": "iot:Subscribe",
          "Resource": "arn:aws:iot:AWS_REGION:AWS_ACCOUNT_ID:topicfilter/konnected/8840f5209948/*",
        }
      ]
    }
  ]
}
The above example grants the authenticated Konnected device permission to connect, subscribe and publish to topics prefixed by the Device ID. Note: substitute AWS_REGION and AWS_ACCOUNT_ID for their actual values.
It is best practice to authorize publish and subscribe only to topics prefixed by a unique device identifier, in this case its ID.
Generating the Token Signature
Step 2 of the [AWS Custom Authorizer tutorial] has you create a public and private key pair for the authorizer. The private key is used to generate a token signature, that is then validated by your custom authorizer. When your cloud service registers a new Konnected device, generate a token signature to be passed to the device during the provisioning step. Example:
echo -n $token | openssl dgst -sha256 -sign private-key.pem | openssl base64 -A
def token_signature
  Base64.strict_encode64(
    OpenSSL::PKey::RSA.new(ENV['IOT_AUTHORIZER_PRIVATE_KEY']).sign(
      OpenSSL::Digest::SHA256.new, token))
end
Best Practice: Securely Store Your Private Key
We recommend using Parameter Store within AWS Systems Manger to securely store and access private keys in your AWS private cloud. Do not store generated token signatures!
Creating the Custom Authorizer
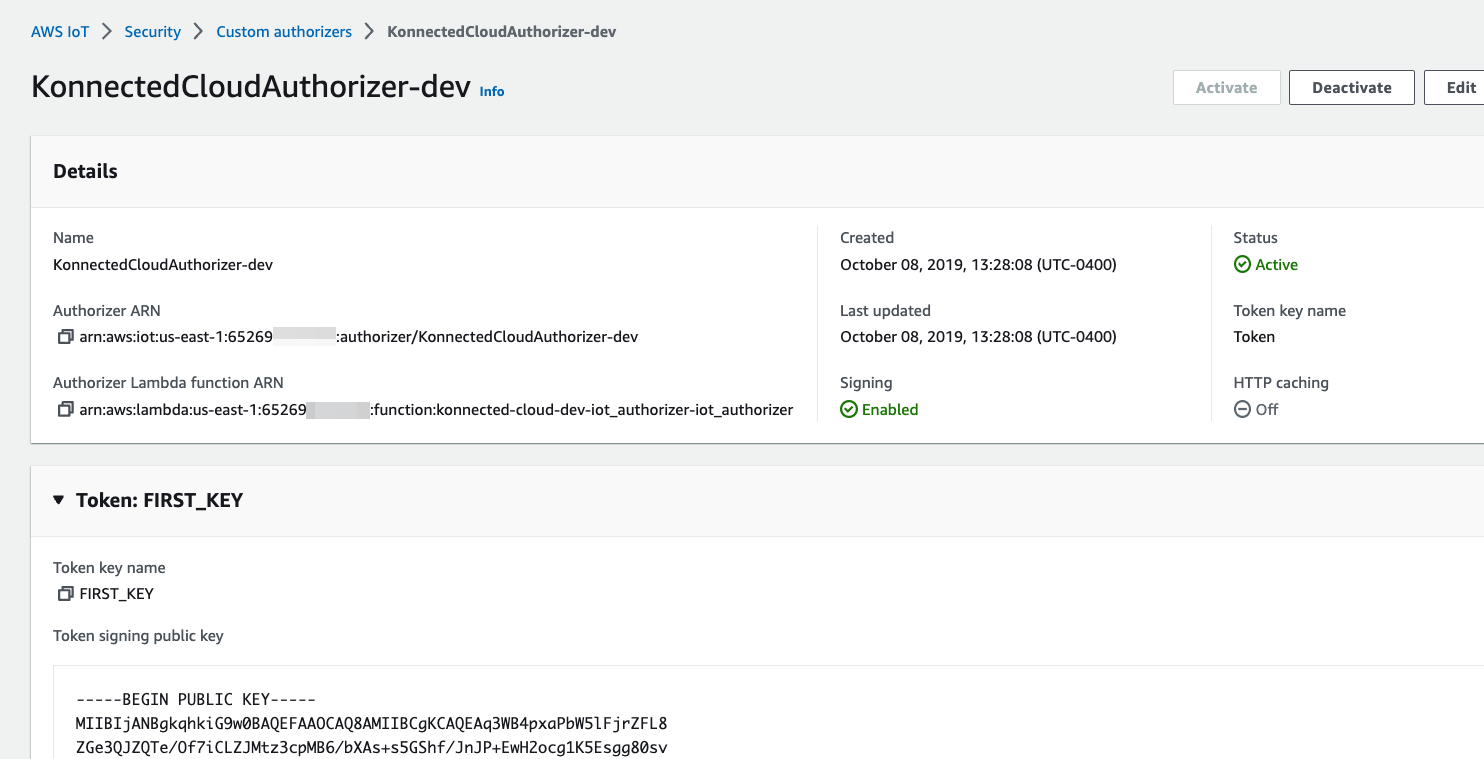
Step 3 of the above linked AWS tutorial has you create the custom authorizer resource on AWS. Custom Authorizers can be created and viewed in the AWS Console at AWS IoT > Security > Authorizers. When creating your custom authorizer for Konnected, make sure the following settings are set:
- Token validation: Enabled
- Token key name: Token
- Public key: public key from Step 2

Provisioning the Konnected Device
Now that you have a token and token_signature and an authorizer Lambda function set up, you can pass the credentials in the Device Provisioning step to the Konnected device. Example provisioning payload:
{
  "endpoint_type":"aws_iot",
  "endpoint":"wss://a35zoibxxxxxxx-ats.iot.us-east-1.amazonaws.com/mqtt",
  "aws":{
    "token":"LRYiB2EsgxDPuQaie2h8atDi",
    "token_signature":"dBwykzlb+fo+JmSGdwoGr8dyC2qB/IyLefJJr+rbCvmu9Jl4KHAA9DG+V+MMWu09YSA86+64Y3Gt4tOykpZqn9mn
VB1wyxp+0bDZh8hmqUAUH3fwi3fPjBvCa4cwNuLQNqBZzbCvsluv7i2IMjEg+CPY0zrWt1jr9BikgGPDxWkjaeeh
bQHHTo357TegKs9pP30Uf4TrxypNmFswA5k7QIc01n4bIyRTm90OyZ94R4bdJsHNig1JePgnuOBvMGCEFE09jGjj
szEHfgAUAQIWXiVGQj16BU1xKpTGSiTAwheLKUjITOEXAMPLECK3aHKYKY+d1vTvdthKtYHBq8MjhzJ0kggbt29V
QJCb8RilN/P5+vcVniSXWPplyB5jkYs9UvG08REoy64AtizfUhvSul/r/F3VV8ITtQp3aXiUtcspACi6ca+tsDuX
f3LzCwQQF/YSUy02u5XkWn+sto6KCkpNlkD0wU8gl3+kOzxrthnQ8gEajd5Iylx230iqcXo3osjPha7JDyWM5o+K
EWckTe91I1mokDr5sJ4JXixvnJTVSx1li49IalW4en1DAkc1a0s2U2UNm236EXAMPLELotyh7h+flFeloZlAWQFH
xRlXsPqiVKS1ZIUClaZWprh/orDJplpiWfBgBIOgokJIDGP9gwhXIIk7zWrGmWpMK9o=",
    "authorizer":"KonnectedCloudAuthorizer-dev",
    "topics":{
      "sensor":"konnected/8840f5209948/sensor",
      "switch":"konnected/8840f5209948/switch",
      "heartbeat":"konnected/8840f5209948/hb"
    }
   },
  "sensors":[
    {"zone":1},{"zone":2},{"zone":3},{"zone":4},{"zone":6}
   ],
  "actuators":[
    {"zone":"alarm", "trigger": 1}
  ],
  "dht_sensors":[
    {"zone":5, "poll_interval":2}
  ]
}
After provisioning, the Konnected device will reboot and attempt to connect to AWS IoT with the connection request signed correctly to invoke the custom authorizer lambda. The function should return a valid policy document, and Konnected is now communicating with your private cloud! 🎉